OBS Streaming <<
Previous Next >> Article impression
Week6-9
直播會議Assignment 2
分工表:
| Topic 1: |
Topic 0: |
| 40623115 |
40723232 |
| 40623251 |
40723234 |
| 40723204 |
40723238 |
| 42723210 |
40723245 |
| 40723212 |
40723250 |
| 40723225 |
40723210 |
Topic 1 的文章很長,自己看要翻哪一大章節都可,Topic 0 有兩篇pdf也是一樣自己決定,要全翻也行自己斟酌。最後是個人網頁要有assignment2,downloads裡面也要有檔案assignment2.pdf。作業期限到4/23,要自行檢查是否完成所有內容。
直播影片:https://youtu.be/a69tNWKmC64
webcam 畫面製作
老師要求每個人之後的影片,都必須要有視訊畫面,所以要準備一台webcam ,但是需要花錢買,我們可以使用手機來代替webcam,就是使用iVcam來進行畫面製作,電腦以及手機都要下載,至於obs與iVcam連線可以參考下方的影片。
教學影片連結:https://youtu.be/YCAGt9qku6I
V-rep bubbleRob Tutorial
操作影片連結:https://youtu.be/BStp8J-KXuY
V-rep 馬達驅動四輪車
使用內建功能來創建模型,並且模擬最基本馬達的直線移動。
影片連結:https://youtu.be/y8DJ1sjuAqM
四輪車鍵盤控制轉向
V-rep 檔案連結: 4 wheel car keyboard.ttt
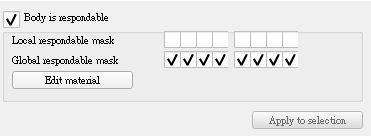
四輪車加上轉向及鍵盤控制,先開啟之前做好的四輪車,將兩個前輪馬達複製貼上,再使兩個馬達原地轉向90度,創建兩個小正方體,位置與前輪一模一樣,需要設定屬性避免與其他部件衝突,本體、輪子、小正方體都要關閉如下圖。
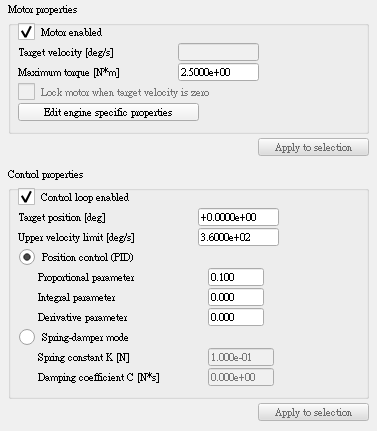
將控制迴路啟用,來控制轉向的限制角度,兩個馬達都用預設即可,如下圖設定。
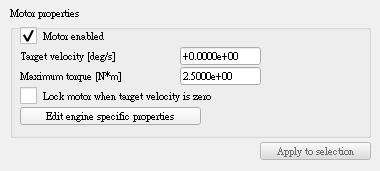
將之前的馬達速度都關掉,點擊馬達圖示視窗下的show dynamic properties dialog,把motor properties的速度改為0,底下的lock motor when target velocity is zero是馬達速度為零時鎖定馬達,可開可不開。
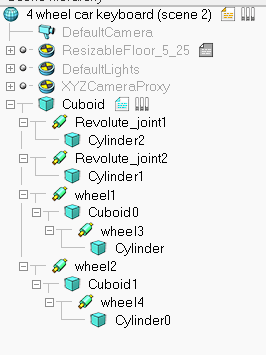
最後把方塊拖移至對應馬達下,再整個放進本體下,把對應的前輪馬達放置方塊下,本體新增一個控制腳本,選擇cuboid,點擊菜單欄的Add > Associated child script > Threaded,將寫好的腳本複製貼上,更改前輪馬達的名子,這樣腳本才能控制,下圖為整個最終結構。
四輪車鍵盤控制轉向程式碼:
-- This script is threaded! It is a very simple example of how Ackermann steering can be handled.
-- Normally, one would use a non-threaded script for that

threadFunction=function()
	while simGetSimulationState()~=sim_simulation_advancing_abouttostop do
		-- Read the keyboard messages (make sure the focus is on the main window, scene view):
		message,auxiliaryData=simGetSimulatorMessage()
		while message~=-1 do
			if (message==sim_message_keypress) then
				if (auxiliaryData[1]==2007) then
					-- up key
					desiredWheelRotSpeed=desiredWheelRotSpeed+wheelRotSpeedDx
				end
				if (auxiliaryData[1]==2008) then
					-- down key
					desiredWheelRotSpeed=desiredWheelRotSpeed-wheelRotSpeedDx
				end
				if (auxiliaryData[1]==2009) then
					-- left key
					desiredSteeringAngle=desiredSteeringAngle+steeringAngleDx
					if (desiredSteeringAngle>45*math.pi/180) then
						desiredSteeringAngle=45*math.pi/180
					end
				end
				if (auxiliaryData[1]==2010) then
					-- right key
					desiredSteeringAngle=desiredSteeringAngle-steeringAngleDx
					if (desiredSteeringAngle<-45*math.pi/180) then
						desiredSteeringAngle=-45*math.pi/180
					end
				end
			end
			message,auxiliaryData=simGetSimulatorMessage()
		end

		-- We handle the front left and right wheel steerings (Ackermann steering):
		steeringAngleLeft=math.atan(l/(-d+l/math.tan(desiredSteeringAngle)))
		steeringAngleRight=math.atan(l/(d+l/math.tan(desiredSteeringAngle)))
		simSetJointTargetPosition(steeringLeft,steeringAngleLeft)
		simSetJointTargetPosition(steeringRight,steeringAngleRight)

		-- We take care of setting the desired wheel rotation speed:
		simSetJointTargetVelocity(motorLeft,desiredWheelRotSpeed)
		simSetJointTargetVelocity(motorRight,desiredWheelRotSpeed)

		-- Since this script is threaded, don't waste time here:
		simSwitchThread() -- Resume the script at next simulation loop start
	end
end

-- Put some initialization code here:
-- Retrieving of some handles and setting of some initial values:
steeringLeft=simGetObjectHandle('Steer_left_joint')
steeringRight=simGetObjectHandle('Steer_right_joint')
motorLeft=simGetObjectHandle('Front_left_joint')
motorRight=simGetObjectHandle('Front_right_joint')
desiredSteeringAngle=0
desiredWheelRotSpeed=0
steeringAngleDx=2*math.pi/180
wheelRotSpeedDx=20*math.pi/180
d=0.755 -- 2*d=distance between left and right wheels
l=2.5772 -- l=distance between front and read wheels

-- Here we execute the regular thread code:
res,err=xpcall(threadFunction,function(err) return debug.traceback(err) end)
if not res then
	simAddStatusbarMessage('Lua runtime error: '..err)
end

-- Put some clean-up code here:
教學影片連結:https://youtu.be/0W1wmC1tr4A
V-rep 更新至最新版本
1.到CoppeliaSim官方網站:https://www.coppeliarobotics.com/ 。
2.點選上方的 Downloads ,下載功能齊全的教育版。
3.下載 : CoppeliaSim Edu, Binaries 可攜的版本。
4.解壓縮完成即可,舊版的就可以刪掉了。

Python remote api 環境配置
在自己的Y槽下輸入以下這三個模組:
1.pip install numpy
2.pip install imutils
3.pip install opencv-python
才可以開始嘗試透過廣域網路連線控制。盡量使用python3.8.2來配置環境,輸入程式時可能會跑很久,是正常的情況。
python3.8.2,輸入leo 後軟體閃退問題
1.輸入 pip list ,檢查leo 版本是否為 6.1 版。
2.是的話就先卸載 pip uninstall leo 。
3.再重新載一次 leo ,輸入 pip install leo==6.2.1 來指定版本。
4.載完之後,再輸入 leo 一次,就可以正常開啟了。

第8周meet第二組直播影片
期中考週線上課程
-
老師與組長開會, 開放 live streaming, 回答與課程相關問題.
-
要求所有學員, 透過個人行事曆建立 Google Handout Meet 會議, 展示個人桌面操作, 開放 live stream, 並錄製至少 10 分鐘的個人期中簡報影片, 說明個人於 W1-W8 所完成的相關內容.
-
完成上述個人簡報錄製後, 將存於個人 Google Drive 中的期中簡報 mp4 影片, 以共享設置為所有登入 @gm 帳號的用戶都可以觀看.
-
完成上述影片共享設置後, 請登入 @gm 個人帳號, 至 https://forms.gle/T1Vs4sv9EdetxoWF7 填寫表單並完成期中個人自評成績登錄.
-
完成上述各步驟後, 將繼續進行線上課程之其他內容直播或錄影.
協同產品設計課程實習項目:
1. OnShape 零組件繪圖及協同設定
https://learn.onshape.com/
2. 零組件轉檔進入 CoppeliaSim
Parasolid
Parasolid-XT-format-reference_2006.pdf
SAT
Sat File format.pdf
https://en.wikipedia.org/wiki/ACIS
DXF, IGES and STEP
DXF_IGES_STEP.pdf
3. CoppeliaSim 零組件轉入後之零件分割, 零件從屬關係組立與控制設定
4. 利用 CoppeliaSim Python Remote API 控制四輪車
5. 將 Remote API 程式結合 Flask + Oauth2 + SQLite 進行 網際機電控制程式開發
6. 利用 Ubuntu 20.04 虛擬主機, 進行網際協同機電系統操控模擬
7. 協同四輪車與平面機構系統產品整合開發
OBS Streaming <<
Previous Next >> Article impression